In the middle of the global pandemic, where my work for my previous company (where I was an intern) was at a VERY low pace… I’ve decided that I had enough of it… I wanted to move forward… I was already thinking of starting my own company and working as a freelancer for a long time, but there was always something. New Projects, too much work, …
But now… There was no work… At least not much… And I don’t like that… I need some pressure in my life. (Not to much… 😉 )
So I left my “golden cage” where I had all the job security I could wish for in this strange time and quit my job… Under the motto: “Life is to those who dare” I had 8 weeks to find a job as a new founded freelancer. Otherwise I wouldn’t have a car anymore, no job, no money…
Life is to those who dare
Following was a VERY STRESSFUL period, where my wife and friends where supporting me. Because you get A LOT of phone calls, but after 3 weeks I still didn’t have anything. So you really start doubting yourself…
But during that 3th week I had an interview with a company for a job that I really wanted. It was perfect for me. Linux System Engineer. The thing that I had the most experience in… And yes… After 2 days stressing about it… I received a phone call… And YES, I got the job!!! I was happy as a kid in a candy store :-D.
Life is a bitch sometimes, but in the end… Everything will be just fine… One way or the other…
Ever wanted that your config files in you docker-stack updated also when you released a new version of your stack through a CI/CD pipeline? Or you where in a development phase where you are constantly changing stuff in the config but you also wanted to make sure that you knew which config was used in what release in the pipeline? Well… Maybe you should try the next trick:
I’m using a gitlab-ci pipeline file here.. But the eventual purpose can be achieved using all Ci/Cd tools. It is just a matter of changing the Variable name.
Here you wil find the ENVIRONMENT value used in the upcoming docker-compose file CONF_VERSION. Which on his term has the value of the $CI_JOB_ID which is a baked in value of Gitlab:
CI_JOB_ID
The unique ID of the current job that GitLab CI/CD uses internally.
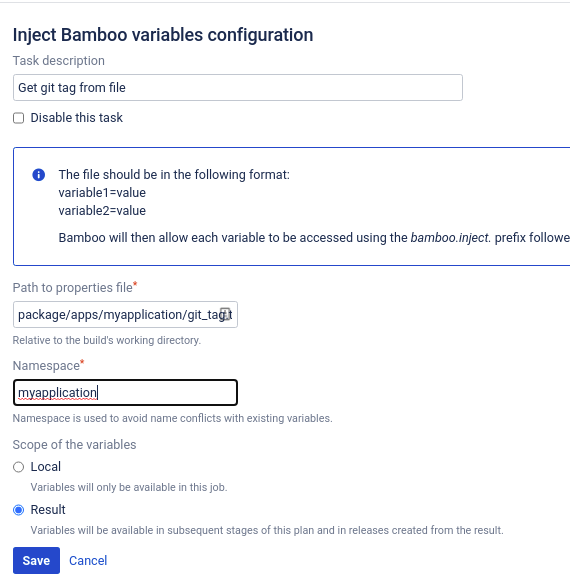
If you where using Bamboo for example you could use bamboo.buildNumber.
After A LOT of struggling to get Nexus 3 running behind Traefik2 I finally got in working, so I thought let’s share this with rest of the world… 😀
Running the GUI behind Traefik2 wasn’t a big deal… It was logging in and pushing the images to it that was a pain in the ass…
So… For everyone that is struggling with the same issue… Here is the answer… (I hope for you). And the problem wasn’t even my docker-compose file… But a setting IN Nexus 3…
My Setup is a docker swarm with 5 nodes. So just keep in mind that my docker-compose file is for a swarm (includes deploy settings and stuff). As an extra I also run my persistent storage on NFS. So it doesn’t matter on which worker the conatiner get’s deployed… So let’s start with the compose files:
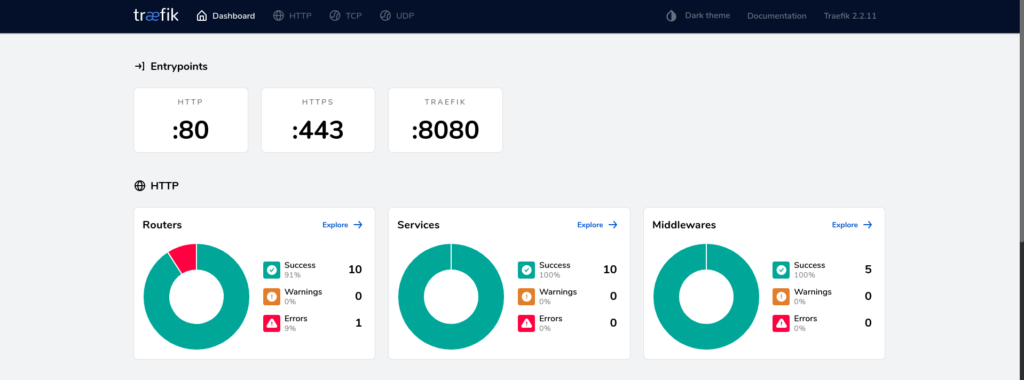
If you deploy these 2 compose files (replacing mydomain.com with your domain) you should have a running traefik V2 (with GUI, on elb.mydomain.com), a nexus running on nexus.mydomain.com and a repository endpoint on registry.mydomain.com.
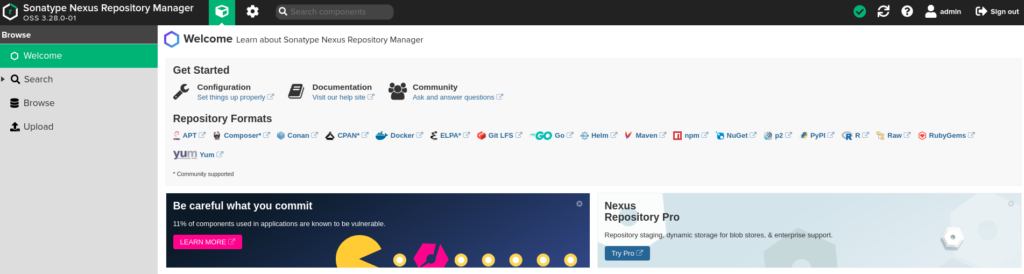
The first time you open nexus you will be asked to give the admin user and the password… You can find this password under /nexus-data/admin.password in your container or nfs share if you did the same as me. Afterwards, just follow the setup.
Let’s create a Docker repository Go to –> Settings –> Repositories –> Create Repository
Give the name of your repository
Check the HTTP connector and add port 5000 (the port you mentioned in the traefik labels for the repository url)
If you want to allow anonymous pulls, you can check that too (optional)
And I’ve also enabled the Docker V1 api (optional)
Click on “Save”
Now, if you try to login…
koen@pop-os:~/Projects/Docker/docker-ha/build$ docker login -u admin -p Password https://registry.mydomain.com:5000
Error response from daemon: Get https://registry.mydomain.com:5000/v2/: dial tcp 192.168.86.200:5000: connect: connection refused
OR
koen@pop-os:~/Projects/Docker/docker-ha/build$ docker login -u admin -p Password https://registry.mydomain.com
Error response from daemon: login attempt to https://registry.mydomain.com/v2/ failed with status: 404 Not Found
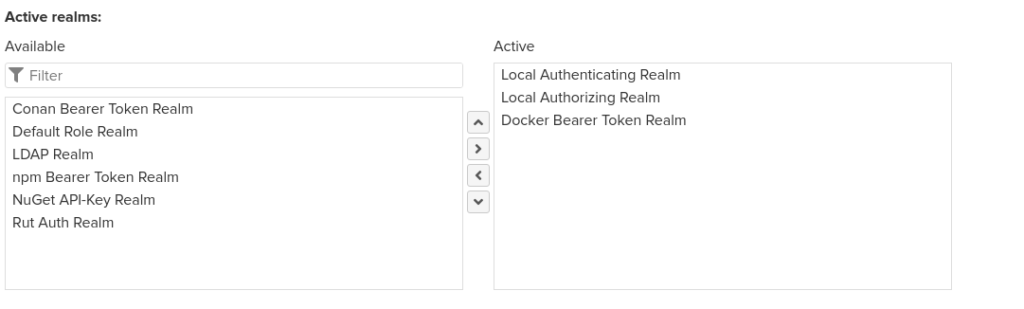
After A LOT of Googling around… I finally found the solution to this problem… Which wasn’t the traefik config… So here it comes… 😀
Go to Settings –> Realms and add the Docker Bearer Token Realm…
I dedicate this blog post to all the several tips and tricks I came across the web. I will add the source of the tip/trick also. Maybe you can find more for you on the source that I didn’t add.
VIM Tips & Tricks
When you want to convert some ENV variables to lower… (I needed this to create a vault file in Ansible for the values of some environment values)
After some cursing and reinstalling servers to make sure I had a clean slate to start, I managed to get it up and running… Happy me 🙂
So, now it was time to deploy something on the cluster… And I started with the nice low footprint gitea app for storing my ansible playbooks, kubernetes apps,… I could have used helm, the easy way… But I was here to learn, so I created the manifest on my own (with help of my good friend Google…). But I did it. It deployed. I could reach it with my external Nginx LoadBalancer. Happy me… 🙂
So… Then came helm… Let’s see how that works… I learned the true value of the values.yml… really… If you starting with pre-created helm charts… Take your time to go through the values.yml to edit it to your environment… It safes some headache…
So, I learned how Helm works, so I was thinking more and more to a fully home CI/CD setup. So what do I need… Keeping in mind that if it was possible I needed low footprint applications…
Docker repository: I went for Harbor. Great tool. Nice GUI. And scans your images on security flaws. https://goharbor.io/
Jenkins (widely used, so…)
Awx… To automatically run my playbooks in conjunction with jenkins . Yes, less low footprint, but hey… Sometimes you need to sacrifice to get want you want…
So, after all that was I installed on my kubernetes cluster… I was ready to start learning Jenkins, Kubernetes and of course some wordpress… And with deploying wordpress I learned the auto scaling functionality of kubernetes… :-D. So… Happy me… Again 😀
The final setup (for now…) looks like this:
And currently following applications are installed:
This guide will show you how to setup a docker swarm. Assuming you already have docker installed.
Setting up docker swarm
For setting up a swarm, you need at least 3 vm’s which will contain:
A manager Node (or more)
And worker nodes
Setting up a manager node
Log in to your Manager vm and run following command:
docker swarm init –advertise-addr <MANAGER-IP>
The other nodes in the swarm must be able to access the manager at the IP address. So be aware of Firewall restrictions, iptables,…
You will get a output like this:
Swarm initialized: current node (dxn1zf6l61qsb1josjja83ngz) is now a manager. To add a worker to this swarm, run the following command: docker swarm join \ --token SWMTKN-1-49nj1cmql0jkz5s954yi3oex3nedyz0fb0xx14ie39trti4wxv-8vxv8rssmk743ojnwacrr2e7c \ 192.168.99.100:2377 To add a manager to this swarm, run 'docker swarm join-token manager' and follow the instructions.
You can add multiple Manager nodes this way:
[me@portainermgr01prod ~]$ docker swarm join-token manager To add a manager to this swarm, run the following command: docker swarm join --token SWMTKN-1-2vqxciwl7q5nmtv7vy6jbeh8ilo29u7bs1eko24ztazn8n87a7-d201wmooe8hd8ll19klmhyt0v 10.136.23.11:2377
Run the “docker swarm join –token SWMTKN-1-2vqxciwl7q5nmtv7vy6jbeh8ilo29u7bs1eko24ztazn8n87a7-d201wmooe8hd8ll19klmhyt0v 10.136.23.11:2377” on the other nodes you want to join as a manager.
Setting up the worker nodes
Log in to your worker nodes and run the command you got from the output of the manager node:
If you don’t have the command available, you can run the following command on a manager node to retrieve the join command for a worker:
docker swarm join-token worker
After you have run the commands on your workers, you can check the status of your workers using following command on the MANAGER node:
[me@portainermgr01prod ~]$ docker node ls ID HOSTNAME STATUS AVAILABILITY MANAGER STATUS ENGINE VERSION onh1rgb37cbgsl2sx6zwlcrlh portainer01prod Ready Active 18.09.7 tyw38g3pl9q2km1kwi4mk0brd portainer02prod Ready Active 18.09.7 uu6sh1gk87bxkughvrwdezber portainer03prod Ready Active 18.09.7 vaq6nqm92vv1raq6pfdzl7y1s * portainermgr01prod Ready Active Leader 18.09.7 7d9g9cx5ce0wn5x114o1m0qz3 portainermgr02prod Ready Active Reachable 18.09.7 scpw73v2ei49udcg36oy2ltrf portainermgr03prod Ready Active Reachable 18.09.7 [me@portainermgr01prod ~]$


Recent Comments